哈喽哇!我是小不,不简说的不。在代码世界疯狂蹦跶的 “非资深选手”🙋♂️!主打一个*“踩坑我来,避坑你学”*。毕竟独乐乐不如众乐乐,让大家少走弯路,才是咱的终极使命✨~
最近我的个人网站 www.ibujian.cn上线啦。欢迎👏🏻各位童鞋围观。
内容持续迭代中...
看效果:

前言
就是因为这个网站的部署,我不想每次部署都用手拖。
前端早已不是最开始的前端了。各种环境配置问题,各种依赖。工程化相关的东西也越来越多啦~
无论是 vite webpack rollup rolldown 都离不开工程化,而用到的的几乎都有 Nodejs
本期实战: 用 Nodejs 部署前端项目。
不要问为什么不用 DevOps 不用 Docker 。
工具依赖说明
本次环境:
- node: v22.15.0
- npm: 10.9.2
npm i archiver dotenv node-ssh -D依赖如下:
{
  "devDependencies": {
    "archiver": "^7.0.1",
    "dotenv": "^16.5.0",
    "node-ssh": "^13.2.1",
  }
}
说明:
- archiver :用于压缩文件
- dotenv :加载 .env 配置文件
- node-ssh : ssh 连接
虽然 node20+ 支持加载 .env 配置。 但还是选择了 dotenv 来处理。
node-ssh 基于 ssh2 封装,更方便一点儿。
ssh库对比:
| 需求场景 | 库 | 理由 |
|---|---|---|
| 需要完整 SSH 功能 | ssh2-promise | 基于成熟的 ssh2,Promise 封装 |
| 简单命令执行 | simple-ssh | API 设计简洁,链式调用 |
| 大量文件传输 | node-ssh 或 scp2 | 专注文件操作,性能优化 |
| 轻量级解决方案 | ssh-exec | 直接调用系统 ssh 命令 |
| 需要隧道或高级功能 | ssh2 | 原生支持所有 SSH 特性 |
开工
首先,创建两个文件,一个脚本,一个配置文件:

先看配置文件
# SSH 连接配置
HOST=localshot # 服务器 ip
PORT=22
USERNAME=username # 用户名
PASSWORD=password # 密码
# 私钥路径
PRIVATE_KEY=.ssh/id_rsa

# 文件路径配置
LOCAL_FILE_PATH=./src/.vuepress/dist
FILE_NAME=blog
# 服务器路径配置
# 默认目录
REMOTE_CWD=/home
# 上传到的路径
REMOTE_TEMP_DIR=/home/temp
# 解压到的路径
REMOTE_EXTRACT_DIR=/home/upload/blog

# 其他选项
# 解压后是否删除原文件
DELETE_AFTER_EXTRACT=true
# 其他扩展...
为什么需要私钥?为了验证安全。而且有些服务器默认可能是不允许直接账号密码连接的。不配置是无法正常连接的。
至于怎么创建私钥, 需要大家去科普科普了。 问问 AI :怎么创建私钥

还是按代码功能 依次说明吧:
加载配置
import fs from 'fs';
import path, { dirname } from 'path';
import { fileURLToPath } from 'url';
import dotenv from 'dotenv';

// 之所以用 import 跟项目配置有关,nodejs版本有关

const __filename = fileURLToPath(import.meta.url);
const __dirname = dirname(__filename);

// 根目录
const rootDir = path.resolve(__dirname, '..');
const configPath = path.join(rootDir, '.env');
console.log(configPath);
// 加载环境变量配置
dotenv.config({ path: configPath });

// 配置信息
const config = {
  host: process.env.HOST || 'localhost',
  port: process.env.PORT || 22,
  username: process.env.USERNAME,
  password: process.env.PASSWORD,
  privateKey: process.env.PRIVATE_KEY,
  localFilePath: process.env.LOCAL_FILE_PATH,
  localFileName: process.env.FILE_NAME || path.basename(process.env.LOCAL_FILE_PATH),
  remoteCwd: process.env.REMOTE_CWD || '/home',
  remoteTempDir: process.env.REMOTE_TEMP_DIR || '/tmp',
  remoteExtractDir: process.env.REMOTE_EXTRACT_DIR,
  deleteAfterExtract: process.env.DELETE_AFTER_EXTRACT === 'true' || false,
};

// 验证必要配置
function validateConfig() {
  const requiredFields = ['host', 'username', 'localFilePath', 'remoteExtractDir'];
  const missingFields = requiredFields.filter((field) => !config[field]);

  if (missingFields.length > 0) {
    throw new Error(`缺少必要配置: ${missingFields.join(', ')}`);
  }

  // 检查本地文件/目录是否存在
  if (!fs.existsSync(config.localFilePath)) {
    throw new Error(`本地文件/目录不存在: ${config.localFilePath}`);
  }
}
压缩文件
// 创建临时压缩文件
async function createArchive(localPath, isDirectory) {
return new Promise((resolve, reject) => {
const archiveName = `${config.localFileName}.zip`;
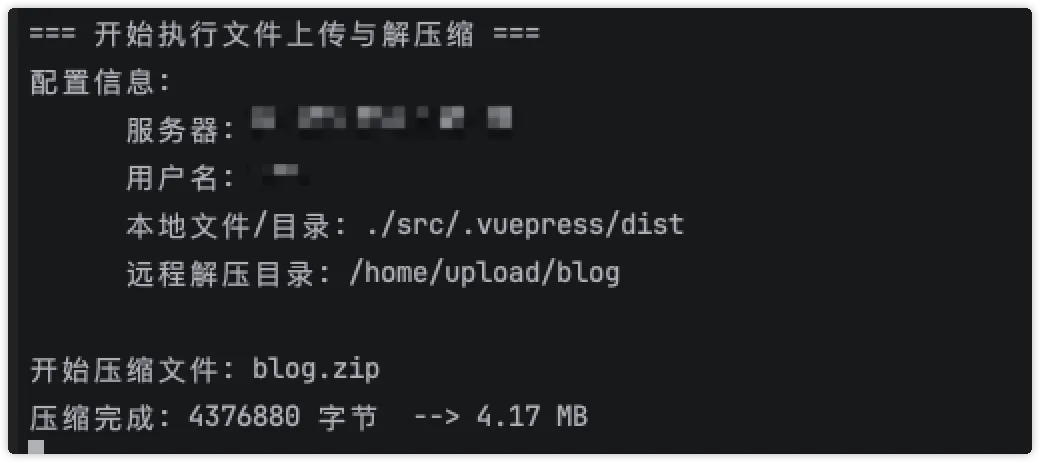
console.log(`开始压缩文件: ${archiveName}`);
const outputPath = path.join(__dirname, archiveName);
const output = fs.createWriteStream(outputPath);
const archive = archiver('zip', {
zlib: { level: 9 },
});
output.on('close', () => {
const sizeInMB = (archive.pointer() / (1024 * 1024)).toFixed(2);
console.log(`压缩完成: ${archive.pointer()} 字节 --> ${sizeInMB} MB`);
resolve(outputPath);
});
archive.on('error', (err) => {
reject(err);
});
archive.pipe(output);
if (isDirectory) {
archive.directory(localPath, false);
} else {
archive.file(localPath, { name: path.basename(localPath) });
}
archive.finalize();
});
}主方法代码
async function main() {
try {
validateConfig();
console.log('=== 开始执行文件上传与解压缩 ===');
console.log(`配置信息:
服务器: ${config.host}:${config.port}
用户名: ${config.username}
本地文件/目录: ${config.localFilePath}
远程解压目录: ${config.remoteExtractDir}
`);
let archivePath = config.localFilePath;
let isTempArchive = false;
// 判断路径是否是文件夹
const pathStat = fs.statSync(config.localFilePath);
const isDirectory = pathStat.isDirectory();
if (isDirectory || path.extname(config.localFilePath) !== '.zip') {
archivePath = await createArchive(config.localFilePath, isDirectory);
isTempArchive = true;
}
const ssh = new NodeSSH();
ssh
.connect({
host: config.host,
port: config.port,
username: config.username,
password: config.password,
privateKeyPath: config.privateKey,
})
.then(async () => {
console.log(`Connected to ${config.host}`);
// 准备远程路径
const remoteFileName = path.basename(archivePath);
const remoteFilePath = `${config.remoteTempDir}/${remoteFileName}`;
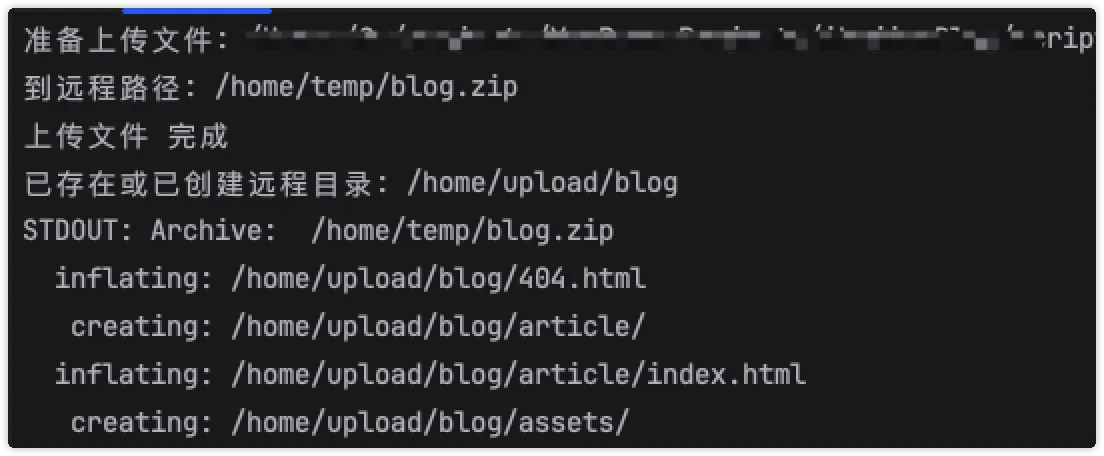
console.log(`准备上传文件: ${archivePath}`);
console.log(`到远程路径: ${remoteFilePath}`);
// 上传文件
await ssh.putFile(archivePath, remoteFilePath).then(
function () {
console.log('上传文件 完成');
},
function (error) {
console.log("Something's wrong");
console.log(error);
},
);
// 创建解压目录(如果不存在)
await ssh.execCommand(`mkdir -p ${config.remoteExtractDir}`, { cwd: config.remoteCwd });
console.log(`已存在或已创建远程目录: ${config.remoteExtractDir}`);
// 解压文件
const result2 = await ssh.execCommand(
`unzip -o ${remoteFilePath} -d ${config.remoteExtractDir}`,
{ cwd: config.remoteCwd },
);
console.log('STDOUT: ' + result2.stdout);
console.log('STDERR: ' + result2.stderr);
if (result2.code !== 0) {
throw new Error(`解压失败: ${result2.stderr}`);
}
console.log(`解压完成: ${config.remoteExtractDir}`);
// 删除临时文件
if (config.deleteAfterExtract) {
await ssh.execCommand(`rm -f ${remoteFilePath}`);
console.log(`已删除远程临时文件: ${remoteFilePath}`);
}
// 删除本地临时压缩文件
if (isTempArchive && config.deleteAfterExtract) {
fs.unlinkSync(archivePath);
console.log(`已删除本地临时压缩文件: ${archivePath}`);
}
console.log('=== 操作完成 ===');
})
.catch((error) => {
console.error('ssh 执行过程中出错:', error.message);
console.error(error);
process.exit(1);
})
.finally(() => {
ssh.dispose();
});
} catch (error) {
console.error('执行过程中出错:', error.message);
console.error(error);
process.exit(1);
}
}使用
调试阶段,可以直接在项目根目录 执行代码:
node ./scripts/upload.js打包自动部署:
修改项目 package.json 中的 scripts
{
 "scripts": {
    "docs:build": "vuepress-vite build src && node scripts/upload.js",
  },
}
写到最后
💡 温馨提示:本文章可随意 “转发扩散”,让更多小伙伴加入 “少踩坑联盟”!毕竟独坑坑不如众坑坑…… 啊不,是独乐乐不如众乐乐😂!
👉 快来关注小不,悄悄说:评论区蹲一个 “你最想知道的代码小技巧,demo”,下一期说不定就为你量身定制啦🎯!